
I do not consider myself a blogging expert, but I have, by trial and error, found out how to update the backround to my blog and thought I would share.
.
.
Firstly, I am using Blogger (not wordpress or any of the others)
.Secondly, you will need to have a photobucket account (or other photo-hosting account) to host your chosen image
.Choosing and Hosting Your Background Image
.
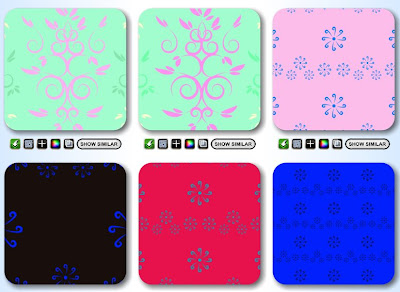 .
.Once you have chosen your copyright-free image, upload it to your photobucket account.
.
.
You will then need to copy the 'Direct Link' html code (as shown below)
.
.
 .
. Changing Your Blog Layout
.
.
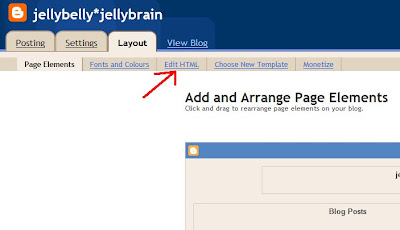
From your customise layout page in Blogger, choose "Edit Html"
.
.
Now you want to Download Your Full Template to your computer. This is an important step, because it will copy all the coding for how your blog looks NOW. In case you make a really big screw-up, you know you have your original coding saved on your PC.
. 
.
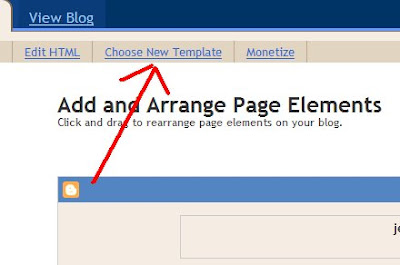
Now go back to the customise layout page and choose "Choose New Template".
.
.
.
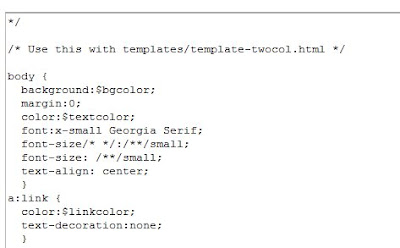
Make sure you have the Minima template selected.
.
 .
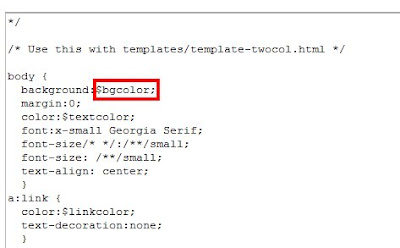
.Go back to "Edit Html" and in the "Edit the contents of your template" box, find the part of the code that looks like this :
.
 .
.
.
 So it looks something like this :
.
 (I have blanked out my full album url)
 .
.
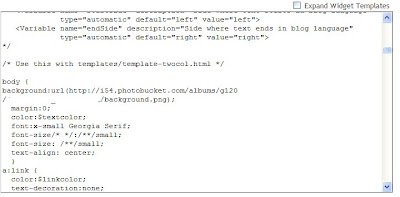
.You want to change this part :
..
With the word " url " followed by the direct link html code you copied from Photobucket.
.So it looks something like this :.
(I have blanked out my full album url).
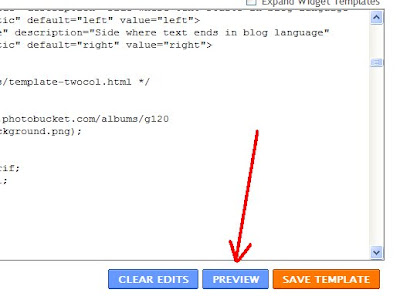
DO NOT CLICK SAVE!
.
To see what your blog is going to look like with your new image, click preview.
..If you're happy, click save and you're done.
.
If not, you can either choose clear edits to cancel the changes you made, or you can find another image and start all over again!
.
Tips
.
Please make sure you use copyright or free-to-use images.
.
If you delete the image from your Photobucket album, the image will no longer appear on your blog.
.Do make sure you download your original template - I learnt that the hard way!!
.


15 comments:
Phew! I thought I might give it a go but having read this..I think I'll keep it simple!
Thank you though.
ooh that's a cool site! x
Really love you new background, might have to visit the site. x
brilliant! thank you!
I keep a premanent copy of my blogger template just in case as i'm always fiddling with the widths etc.
can't wait to try this one.
I think I will need to give this tute more attention when it is not 3.39 on a Wednesday afternoon, and have now hit the mid afternoon wall. And when I'm not starting to panic about dinner because all I took out of the freezer was 6 chorizo sausages and a chicken breast and have no idea what to do with them. (What was I thinking?) and when I don't have to have dinner all done and dusted so the kids can get to athletics by 6.00pm either! But thanks yours looks great!
Hello chick...yes that does show you how to do the background...but not the white panel in the middle...if people use patterned backgrounds with the minima...wont it be for the whole background...?
Do you get my drift? oh it is late i cant sleep - i know what I mean but i cant explain it! hehehe!!
Love Happy xx
Thats all very helpful . I will save it and try??? it , thanks.
clares craftroom
This is such a good tutorial!
I use photobucket to host all my pictures and love it.
Just thought I would leave a comment, saying thanks for the tutuorial on changing your background on your blog. Really useful, although I had to get my husband to help!!! I am a bit of a computer dunce!! lol.
I have changed mine now and have wanted to since I started my blog.
So cheers.
thanks for sharing that emma :) i have a couple of awards on my blog for you x
great stuff! thanks for the email honey xx
I love your blog and all the ideas you keep coming up with chick :)
Keep in touch - love Happy x
Thanks for the tutorial, fab !
EXCEPT ....
Agh ... I've had a go and although I've got my background onto my blog, it's over the text and photo's too. How did you get the pattern design just down the sides leaving a white strip down the middle of the page for the blog images, text and links ?
Any help would be fab xx
Actually the photo's are on top of the pattern backbround but the text and links are underneath the pattern so difficult to read. What have I done wrong ? :(
OMG! Thanks soo much for the help! XD
I did this and it worked - But now I don't have a white background where the text is. It's fairly difficult to read text over my background.
Post a Comment