

.
Skill Level : Easier Than You'd Think!
.
Click on any photograph to see larger image.
.
You will need :
.
A wooden or mdf object
White / light colour matt emulsion paint for the undercoat
Mod Podge – either gloss or matt finish
Paintbrush
Paper napkins
Any trimmings, ribbons, buttons for embellishment
.
You will need :
.
A wooden or mdf object
White / light colour matt emulsion paint for the undercoat
Mod Podge – either gloss or matt finish
Paintbrush
Paper napkins
Any trimmings, ribbons, buttons for embellishment
.

.

.

.
1) Remove all the hinges from the box
.

.
2) Mark on the inside of the box where the holes for screwing are – this will make life easier at the end of the project!
.
3) Apply one coat of matt paint to the surfaces of your box that you wish to cover
.

.

.
2) Mark on the inside of the box where the holes for screwing are – this will make life easier at the end of the project!
.
3) Apply one coat of matt paint to the surfaces of your box that you wish to cover
.

.
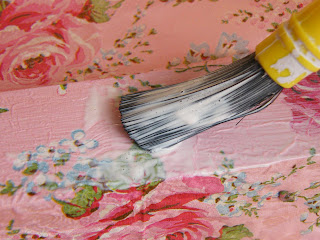
4) When the paint has dried, apply the Mod Podge – again, to all the surfaces you wish to cover
.
5) Separate ALL layers of your paper napkin until you have just one layer. (This takes a bit of practice but it is crucial that you only have one layer of napkin.)
.
5) Separate ALL layers of your paper napkin until you have just one layer. (This takes a bit of practice but it is crucial that you only have one layer of napkin.)
.


.
6) Gently lay the napkin onto your box trying to avoid getting any creases.
.
7) With Mod Podge on your brush, gently apply a layer over the top of your napkin, smoothing it onto the box carefully with your brush. This layer of Mod Podge seals your napkin and acts like a varnish
6) Gently lay the napkin onto your box trying to avoid getting any creases.
.
7) With Mod Podge on your brush, gently apply a layer over the top of your napkin, smoothing it onto the box carefully with your brush. This layer of Mod Podge seals your napkin and acts like a varnish
.

.
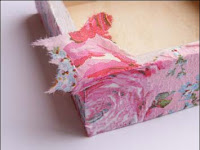
8) Don’t panic if you get some tears or rips. Try to find a matching part of the pattern on another napkin and tear a piece off to cover the rip. Don’t cut it with scissors, as you want the torn edges to blend into the ripped piece. Stick your “repair” piece onto your box with the Mod Podge on your brush.
8) Don’t panic if you get some tears or rips. Try to find a matching part of the pattern on another napkin and tear a piece off to cover the rip. Don’t cut it with scissors, as you want the torn edges to blend into the ripped piece. Stick your “repair” piece onto your box with the Mod Podge on your brush.
.


.
Fixing a tear
.
9) Fold down all the corners, trimming off any excess and smoothing down with Mod Podge on your brush.
.
10) When your box has gone tacky, gently poke some holes through the tissue paper so that you can screw the hinges back into place later.
.
11) Leave to fully dry and that’s it!
.
12) Screw the hinges back into place and decorate with any embellishments.
.
You could also line the inside of the box in the same way, just make sure the outside is completely dry first.
.
If you don't want to use a box, this process will work on any wooden or mdf shape.
.
I got my box from Steve at Craft Shapes and if you ask him nicely, he even drills holes in his hearts for you.....
.

.
Just say I sent you!
.
I hope maybe that's inspired you to have a go ... I'd love to see pictures of any projects you make!
.


11 comments:
I actually think I could manage that. And it looks really really good too!!!! Right - NAPKINS, wooden box, glue stuff...shopping list is ready!!!
I just knew that one would be yours!! Have you guessed which one is mine??!!
I am liking those hearts!!
Great idea...I'll give it a go! ;-)
It's a great box decoration project. A really simple idea that gives a lovely result.
Should've known the pink and flowery one was yours ;o). It is lovely.
It's funny - I've got a stash of pretty napkins, which I've always thought could be used for something but I've never known what. I'm going to buy some blanks off Steve...
Love this. I have some magnet boards with wood frames. They have been waiting for this project.
So nice! Decoupage is a nice way to decorate! You can use it even on fabrics.
Excellent tute! Looks like a fun activity with very effective results!
Oh something else that is beautiful and must be done!!!! I must have a go at that , they look gorgeous!!!! Thankyou Jelly!!!! Love it!! SusieQ xx
where do you buy mod podge in the uk??? please?
Hey...just did it with a backgammon set I made. It - fingers crossed - seems to have worked a treat.
I was going to use some spray satin varnish on the whole thing - will this be ok with the napkin?
Thanks so much!
Aneil, London
Post a Comment